

How to remove video background and replace it with your preferred backgrounds? | 100% lossless Method

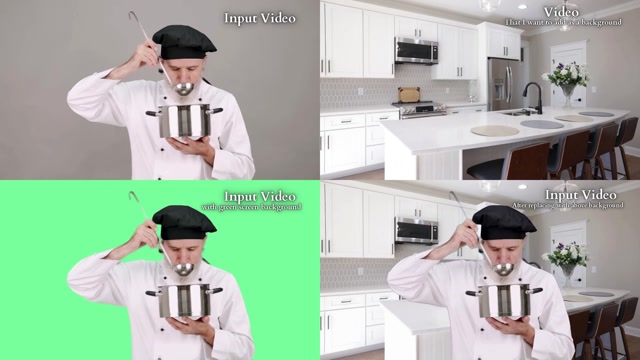
About This Video This is a comparison video featuring four different stages of the background replacement process. At the top left, you can see the original input video, where a chef appears to be smelling his recipe against a dull and uninteresting background. At the top right, you can see the background video I've chosen to add to the original footage. It perfectly complements the scene, featuring a slow-motion view of a kitchen. Now, let's see the transformation! At the bottom left, you can see the original video after its background has been removed and replaced with a green screen using Pixbim Video Background Remover AI. Finally, at the bottom right, you can see the finished result, where the preferred kitchen background has been added to the original footage. This new background brings the entire scene to life, making the chef's appreciation of the aroma feel more engaging and visually appealing. This is a lossless method of replacing a video background! --- The background of the original input video has been removed using Pixbim Video Background Remover AI. You can replace your videos' backgrounds with millions of different scenes without any usage limits or restrictions on video duration. Try it here: https://pixbim.com/video-background-remover-ai --- How to Remove a Video Background and Add Your Preferred Background Using Pixbim Video Background Remover AI Step 1: Download and Install Pixbim Video Background Remover AI First, download Pixbim Video Background Remover AI from the official website and install it on your computer. Step 2: Import Your Input Video Open the software and load the video whose background you want to remove. Step 3: Remove the Original Video Background Click the 'Start Removal Process and Save Video' button to begin the background removal process. Once the process is complete, you will get an output video with the original background removed and replaced with a green screen. This is the recommended workflow for achieving a clean background replacement. First, convert your original footage into a green-screen video. You can then use it to add any background of your choice. Step 4: Add Your Preferred Background Video Finally, import your preferred background video and combine it with the green-screen footage. This allows you to create a completely new scene while retaining the quality of your original video. That's it! You have successfully removed the original video background and replaced it with your preferred background using Pixbim Video Background Remover AI. . . . . . . #replacebackground #removebackground #removebackgroundfromvideo #makegreenscreen #makegreenscreenvideo #greenscreenvideo #videobackgroundremoverapp #aivideobackgroundremoval #pixbim #pixbimvideobackgroundremoverai #unlimitedvideobackgroundremoval #nosubscriptions #unlimited #onetimefee #lifetimevalidity #lifetimeusage